


Using Illustrator For Smooooth Landforms & CLEAN Lines
I. Introduction
Hello all! Ascension brought up that you all might be in need of some Illustrator tutorials. Now, I've never exactly written something like this, but I've been playing with Illustrator for a couple years now, and I figure I might have some experience to impart on what is a rather daunting program if it's your first time using it. Now, I am fairly sure that many of these techniques can be translated to other vector programs, I just don't use other vector programs, so your guess is as good as mine.
Programs used for this tutorial were Illustrator 12, Photoshop 9 & Fractal Terrains Pro (YMMV).
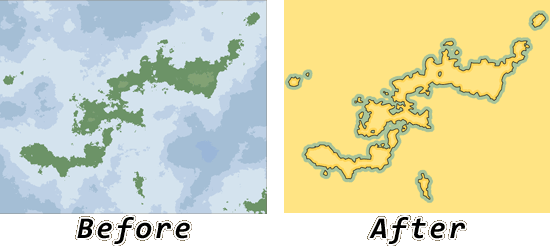
I am going to go through the steps in taking a simple randomly generated landform from Fractal Terrains Pro to something like this:
II. Optimizing Your Source Image
Before we even get to Illustrator, we need to tweak our source image a bit.
If you are using Fractal Terrains Pro for your source image, we need to change the default lighting settings - with the map showing Altitude, Go Map -> Lighting and Color and uncheck blended and shaded for both land and water (don't worry about my coloring scheme here, I'm running a custom one, so yours won't look exactly the same, but the important thing here is that we just have raw pixels without embellishments. Now export (or print screen), and take this newly generated landform into your raster graphics editor of choice (Photoshop, GIMP, &c.).
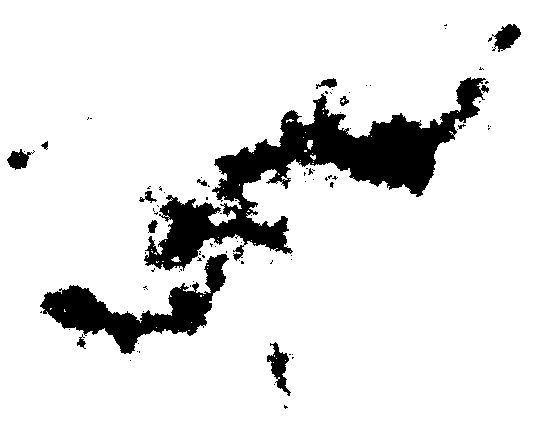
Now that we have our basic landform here in our graphics editor, we need to paint all the land black and all the water white, leaving us with an image that is just black and white. Now that our source image has been optimized for Illustrator, save as a .png.
Full-view
III. Using Live Trace to Get Those Smooth Landforms
We'll be using these tools out of Illustrator's toolbox:
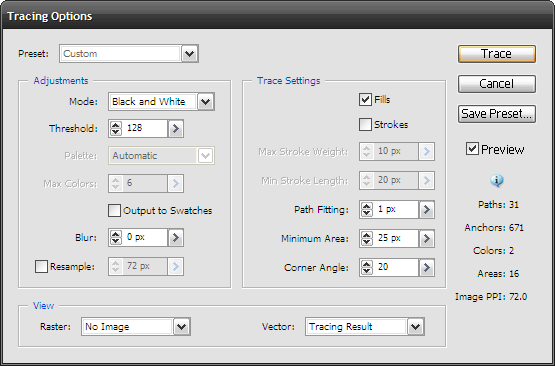
Open your .png source image in Illustrator. Next go Object -> Live Trace -> Tracing Options. You will be presented with this screen:
Live trace is a powerful tool to convert raster images to vector, and it's utility goes far beyond converting black/white images to smooth landforms, but that's beyond the scope of this tutorial.
Mode: Black and White - This option will generate a simple black and white vector of the source image. Ideal for our purposes here.
Threshold: Defines at what level of grey the divide between black and white is interpreted. Default is 128 or 50% grey, and is fine for our purposes here.
Blur: Our source image is heavily pixelated and without some sort of blur prior to vectorization, there will be a lot of jagged little areas. I used a blur of 1 px, but other values may yield better results for you.
Fills/Strokes: As we are converting solid shapes and not lines, select fills.
Path Fitting: This value determines the level of fidelity that the vector will have to the finished image, the lower the number, the more exact. A level of 0 px would have the finished product remain pixelated, just vectorized pixels. I used a level of 1 px, but, again, other values may yield better results for you. It's not an exact science.
Minimum Area: This value determines how many pixels will comprise the smallest element in the tracing. I used 25 px here (a 5x5 px island is the smallest possible element conserved from the source). Smaller values will retain more detail, but certain strokes I intend to apply to the finished artwork (most notably an inside stroke of 5px - more on that later), behave poorly when they are applied to something smaller than the square of its size.
Be sure to check Preview as you are playing with the values; it will show you what your landforms will look like before you apply the trace. Once you are satisfied with the landforms, press Trace.
Full-view
Now, you can save this image right now and export to your favorite raster editor, or you can continue to play around in Illustrator. I'm going to stay in Illustrator and show you guys how to apply some simple strokes.
IV. The Power of Illustrator and Clean Lines
Select your tracing result. Now, up top, in the tracing bar, click Expand. With the tracing still selected, go Object -> Ungroup. Deselect, and, using the Direct Selection Tool (white mouse pointer icon in tools, to the right of the black mouse pointer), select some water. Now go Select -> Same -> Fill Color and press Delete. This will leave you with a black landform shape.
Full-view
Now, make three copies of this layer containing your landform (for a total of four). The topmost layer is going to be your black outline, the middle your land color and inline and the bottommost your water outline.
With the topmost layer selected, go to the fill/stroke palette on your toolbar and click the Reverse icon in the left corner - so that there is no fill and the stroke is set to black. Now in the stroke bar, ensure that Weight is set to 1 px, the stroke is aligned to the Outside and you have Butt Cap & Round Join selected. Now you have your black outline.
Full-view
With the second layer selected, go to the fill/stroke palette on your toolbar and set the fill to something like #FFE384, and the stroke to something like #FFD457. Now in the stroke bar, ensure that Weight is set to 5 px, the stroke is aligned to the Inside and you have Butt Cap & Round Join selected. Now you have your colored landform and nice little inside stroke.
Full-view
With the third layer selected, go to the fill/stroke palette on your toolbar and set the fill to something like #FFE384, and the stroke to none.
With the bottom layer selected, go to the fill/stroke palette on your toolbar and set the fill to none, and the stroke to something like #A8C399. Now in the stroke bar, ensure that Weight is set to 14 px, the stroke is aligned to the Center and you have Butt Cap & Round Join selected. Now you have your water outline.
Full-view
Now the only thing left to do is set a background, so select the Rectangle Tool from the Toolbox, and drag to create a rectangle to serve as the background. Make sure it is placed below all other layers. Set the fill to the same as the fill in the middle layer and the stroke to none.
Full-view
Now save the image and export to your favorite raster editor for some post work, or just stare at those lovely smooth lines.
Attached is my Adobe Illustrator (.ai) file of the finished product:
 Full-view
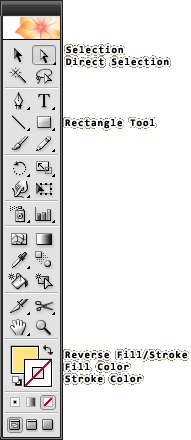
 Full-view
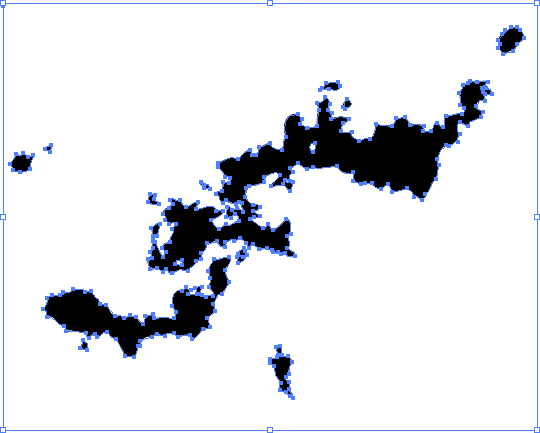 Full-view
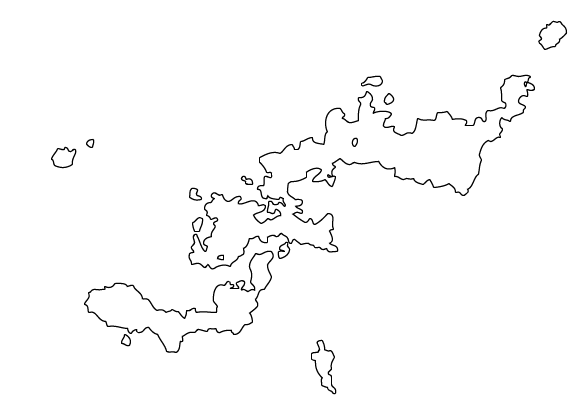 Full-view
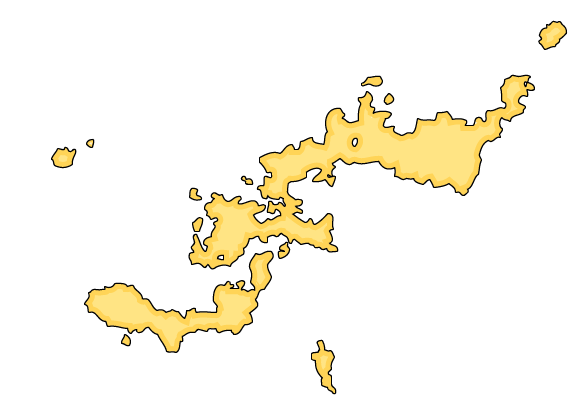 Full-view
 Full-view
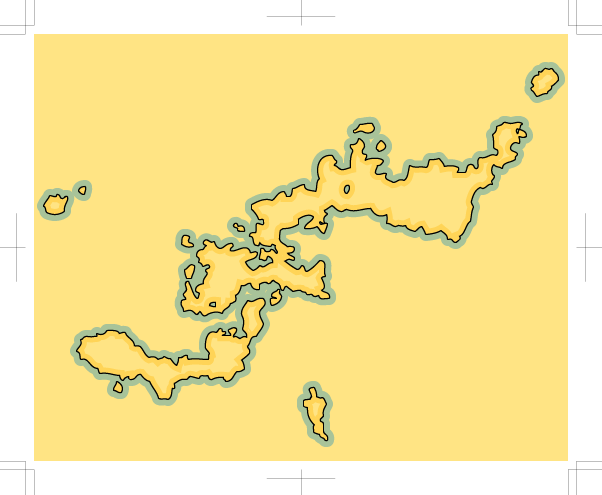 Full-view
 Reply With Quote


