Page 2 of 3 FirstFirst 123 LastLast
Results 11 to 20 of 21

Thread: Burgenos WIP, as promised

  1. #11
    Community Leader jfrazierjr's Avatar
    Join Date
    Oct 2007
    Location
    Apex, NC USA
    Posts
    3,057

    Post

    Quote Originally Posted by Hoel View Post
    Thanks for the input, I'll go over the roads and recolor.
    I want to find a way to repaint the color of the houses individually (most of the houses on the east side actually are teracotta, It's a romans-with-firearms campaign) but it's really too much work. I tried using clouds but it's too big.
    I'm gonna post an update tonight.
    Are you using Gimp or Photoshop? If one of those, then read below:

    Do you have a Channel for the buildings? If not, can you turn off all the other stuff(layers), select, and create a channel? If you can, then changing color would would be somewhat easy as long as you don't want specific buildings specific colors.

    Create a plasma layer and then color map that to a gradient with the colors you want. Then apply your Channel as a layer mask and poof... different color buildings.

    This also assumes that you bump mapped a 50% grey layer set to Overlay instead of directly on the layer with the buildings, otherwise, you would have to do your bump map again(you might want to get in the habit of using this technique since it's none destructive anyway).
    My Finished Maps
    Works in Progress(or abandoned tests)
    My Tutorials:
    Explanation of Layer Masks in GIMP
    How to create ISO Mountains in GIMP/PS using the Smudge tool
    ----------------------------------------------------------
    Unless otherwise stated by me in the post, all work is licensed under a Creative Commons Attribution-Noncommercial 3.0 United States License.

  2. #12
    Community Leader NeonKnight's Avatar
    Join Date
    Aug 2007
    Location
    Surrey, Canada, EH!
    Posts
    5,051

    Default

    I agree with Gandwarf, needs more streets. To my eye, if there are only a handful at most of major streets only, it would be sheer hell to ship goods/materials, people etc anywhere in the city. Also, sewage would be atrocious, as there is no way for the sewage to move out of the clustered areas of town. As an example check out this area of Italian Town/City of Campobasso:

    http://maps.google.ca/maps?hl=en&ie=...19312&t=h&z=16

    As you can see, the building are clustered, but lanes/thouroufares/roads etc still exist between the buildings to allow trafic and goods to flow through various parts of the community.
    Daniel the Neon Knight: Campaign Cartographer User

    Never use a big word when a diminutive one will suffice!

    Any questions on CC3? Post them with CC3 in the Subject Line!
    MY 'FAMOUS' CC3 MAPS: Thunderspire; Pyramid of Shadows; King of the Trollhaunt Warrens; Demon Queen's Enclave

  3. #13
    Guild Artisan Hoel's Avatar
    Join Date
    Nov 2008
    Location
    Skövde, Sweden
    Posts
    658

    Post

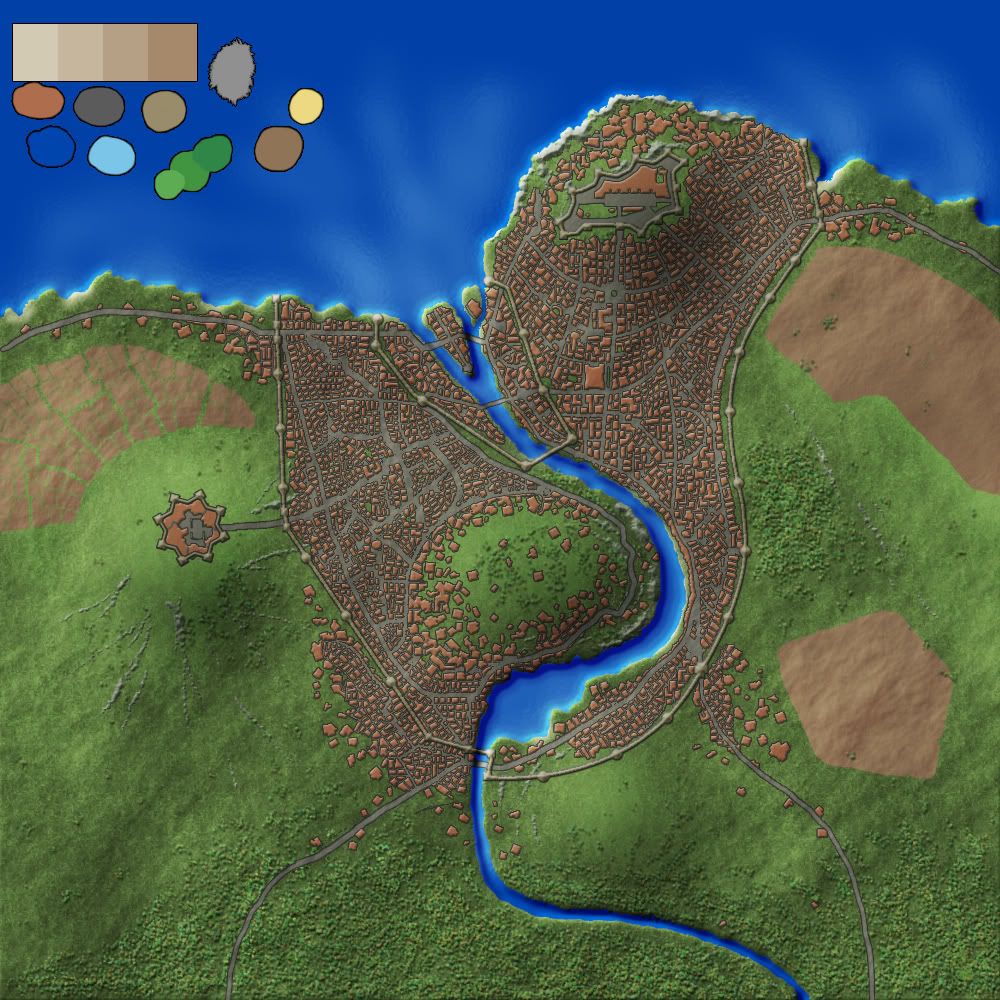
    So, here is my progress.

    I've tried some work with the roof colors, but i think i will stick with teracotta roofs. To much work to hand color every roof even if I have everything in nice ordered layers.
    I went to town pretty good with my wrecking ball to create more space and i really like the look. Next city map will have a whole new creation method with several steps of creating roads and buildings and then removing them.
    As you can see I've started on the fields. The process i'm planning is;
    1. Solic colored dirt brown fields on a new layer
    2. Erase wit a 3px eraser to divide individual fields
    3. Trace some of the dividers with a 5px eraser for more organic look
    4. Select the fields and contract selection by 2px and create new layer for crops
    5. Paint crops with a 'bushy' brush with color dynamics set to alternate between different hue sat and bright.
    6. Repeat 5 with yellow for grains, green for veggies and leave some fields brown.
    7. use some form of BW pattern overlay to hint at furrows.
    I'm trying this at the moment, if it looks as good as my tests suggest, I'll write a tut.

    Oh yeah, I've rearranged the layers so the terrain bump and shadow goes on top of the city layers, what do you think?

  4. #14

    Praise Great job!

    Great job, GIMP obviously. I love the bump map hills, very realistic looking city with hills. Have some REP!

    GP
    Gamer Printshop Publishing, Starfinder RPG modules and supplements, Map Products, Map Symbol Sets and Map Making Tutorial Guide
    DrivethruRPG store

    Artstation Gallery - Maps and 3D illustrations

  5. #15
    Guild Artisan Hoel's Avatar
    Join Date
    Nov 2008
    Location
    Skövde, Sweden
    Posts
    658

    Post

    Sorry, missed that question.
    PS CS3 actually. I'm thinking of GIMP but PS CS4 will have some cool stuff...

  6. #16
    Community Leader jfrazierjr's Avatar
    Join Date
    Oct 2007
    Location
    Apex, NC USA
    Posts
    3,057

    Post

    Quote Originally Posted by Gamerprinter View Post
    Great job, GIMP obviously. I love the bump map hills, very realistic looking city with hills. Have some REP!

    GP

    Agreed. Two things stand out right now for me. 1) there is a bit of banding in the river at the large "crook" in the middle of the image. A quick hit with a fuzzy brush and the blur tool will knock that right out in seconds. 2) The island at the mouth of the river, where the bridge crosses the shadows are on top of the bridge. This makes it look like the bridge is warped. Might want to hard erase that on the shadows layer so it looks like the bridge is at the same level as the land around it.
    My Finished Maps
    Works in Progress(or abandoned tests)
    My Tutorials:
    Explanation of Layer Masks in GIMP
    How to create ISO Mountains in GIMP/PS using the Smudge tool
    ----------------------------------------------------------
    Unless otherwise stated by me in the post, all work is licensed under a Creative Commons Attribution-Noncommercial 3.0 United States License.

  7. #17
    Guild Artisan Hoel's Avatar
    Join Date
    Nov 2008
    Location
    Skövde, Sweden
    Posts
    658

    Post

    Put the last bits in. Final here.
    Got the fields working and i used smudge to even out the bridges.

  8. #18
    Community Leader Korash's Avatar
    Join Date
    Nov 2008
    Location
    Montreal, Canada
    Posts
    1,601

    Post

    Looking good! Slums are much better that the first one.

    repped
    Art Critic = Someone with the Eye of an Artist, Words of a Bard, and the Talent of a Rock.

    Please take my critiques as someone who Wishes he had the Talent

  9. #19
    Community Leader jfrazierjr's Avatar
    Join Date
    Oct 2007
    Location
    Apex, NC USA
    Posts
    3,057

    Post

    Quote Originally Posted by Hoel View Post
    Put the last bits in. Final here.
    Got the fields working and i used smudge to even out the bridges.

    Those fields look most excellent!

    btw, you know you can upload your files directly to the site right? There is a file size limit of around 4.5 MB for png or jpg files and a limit of around 35 million pixels, but your map appears to be well under that limit. This also creates a nice thumbnail for people to view and they can click on it to see the full sized version. When you create a post, click the Go Advanced button and below the text input area is a Manage Attachments button (or you can click the paperclip icon above the text, right beside the smiley). Anyway, new popup window appears and you can upload your files, up to 5 per post. Alternatly, if you want to keep the file on a seperate site, you can point to a URL and said URL will be uploaded instead.
    My Finished Maps
    Works in Progress(or abandoned tests)
    My Tutorials:
    Explanation of Layer Masks in GIMP
    How to create ISO Mountains in GIMP/PS using the Smudge tool
    ----------------------------------------------------------
    Unless otherwise stated by me in the post, all work is licensed under a Creative Commons Attribution-Noncommercial 3.0 United States License.

  10. #20
    Guild Artisan Hoel's Avatar
    Join Date
    Nov 2008
    Location
    Skövde, Sweden
    Posts
    658

    Post

    I link them in because a) I never have to worry about size limits if I decide to do a really large map and b) I use the same images for the campaign, so they're already online.
    I just realized that some users may have limited bandwith so a thumbnail might actually be nice to them. I'll think about it

Page 2 of 3 FirstFirst 123 LastLast

Posting Permissions

  • You may not post new threads
  • You may not post replies
  • You may not post attachments
  • You may not edit your posts
  •