Reply With Quote
Great map! Legible yet detailed, well thought. And The layout and frame are definitely a plus.

Agreed. Nice work GWN
Artstation - | - Buy Me a Kofi
Great map! Legible yet detailed, well thought. And The layout and frame are definitely a plus.
Thanks for the suggestion Gidde. I think I'll try that next time around, although maybe I'm just not reading something correctly, but MistyBee suggests adding text before resizing, so it is just different opinions on the same problem?Well, first, I don't think it looks bad. The map itself is awesome, nice job!! Also, the labels in the map look just fine as well.
But if you REALLY want to get nitpicky about the legend text, the problem is that sizing text after the fact isn't as effective as sizing the pic and then using a smaller font size. You're losing anti-aliasing and the nuances of scaling text. This is really visible on a serif font like the one you've used, because the serifs and the thick parts shouldn't scale at the same rate (and when you scale an image that is what happens).
Try scaling without the legend text, then re-doing the legend in a smaller font size for the smaller image size. It will be beautifully crisp and clean.
Thanks for the suggestion MistyBee. Are there particular settings or workflows you use when resizing your maps? Simply using the "image size" function in Photoshop and bring the resolution down? I'm curious about how others do it.A very good map, North ! Congrats for it
Not sure if it helps at all, but :
Never trust Photoshop's zoom : it always looks bad and blurry if you're not at 25, 33,33, 50 or 66,67%, while it's not when actually resized. Also, always resize your map with all your layers, and flatten them later : it helps lines and text to be better.
In terms of buildings, I had it set up in a few stages: One Photoshop path for blocks (which became the thickest outlines and represented collections of buildings with adjoining walls), one path for buildings (slightly thinner stroke now, separating the actual structures), and one for roof lines (thinnest stroke, to give detail with eaves, etc). Then I filled the whole block layer and used it as a layer mask for the shading (which is just a duplicated layer of the block fill color, set to multiply, and then masked out where the sun would be hitting the roofs). Everything else, from the trees to the streets to the boats is pretty much hand drawn with my tablet.Very nice map. I'm curious to learn more about the technique you used to create it.
Wow, it does wonders for my confidence that other people are drawing inspiration from my work!Adfor
Just lovely, very crisp and clean looking, I bet they have street sweepers employed. This is great inspiration for a city map I'm just starting to work on.
Cheers!
IR
And thanks to everyone else for all the kind words so far. I appreciate all the support!
My business website: https://www.greatwhitenorthcartography.com/
My full cartographic portfolio: http://cargocollective.com/BodennerC...phic-Portfolio
My Patreon account: https://www.patreon.com/user?alert=2


An excellent map. Very clean and crisp.
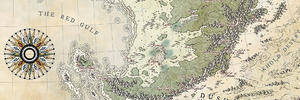
To my eye, the street labels on the map are very legible; the green labels less so.
But I always have trouble reading light lettering on a dark background (the legend).
I've found that dark text on a light background is much easier to read.
And it usually looks crisper.
If I may answer to a question that is not asked to me : I think it's mostly a different working method and may depend if you work for digital or for print.Originally Posted by GreatWhiteNorth

If you work for digital, you'll need a clean map with a pretty low resolution. In this specific case, it can be useful to separate the map itself and the labels : draw/generate/other the map at the highest resolution, then resize it at the destination size/resolution, and then add labels to make sure they're readable.
If you work for print (as I always do), you have to deal with both the highest resolution for the print (often 300dpi) + a lower resolution to post on the Internet, but you don't want to redo your labels for both versions. For this, I always conceive my maps as a whole : I draw as close as possible to the destination size, and add my labels directly on this high-resolution version (which is especially necessary especially when I add calligraphic ornaments or "label-boxes", as there's a strong interaction between the raster drawing and the vector labels). This method is closer to the traditional pen-on-paper one, and that way I'm sure the interaction between the map and labels is perfect for the print version. But of course, I still need to resize the map for the Internet (see below).
Nothing particular, as far as I know :
- As explained before, always thinking my labels & text upfront, keeping in mind the "destination" size (map once printed, map once resized for web) and not the "working size" in full-res, to make sure the readability will be preserved once the map is or printed, or resized.
- Definitely using the Photoshop "image > image size" (alt+ctrl+i)
- Always resizing with all layers still there, and flatten them after resizing : this is the most important : that way, the anti-aliasing is totally preserved, as the text is resized when still vector.
- Usually changing the resolution instead of the size of the map : I work in 300dpi, but rezise to 150 or 100dpi, depending on the map, when I post it on the Internet.
That is one beautiful and admirably detailed piece of work GWN. The color scheme is simple and attractive and the city is well laid out. Excellent work!
Cheers,
-Arsheesh
Great map, looks like a lot of work!
My Battlemaps Gallery http://www.cartographersguild.com/al...p?albumid=3407
arsheesh
That is one beautiful and admirably detailed piece of work GWN. The color scheme is simple and attractive and the city is well laid out. Excellent work!
Cheers,
-ArsheeshThanks for the kind words!Bogie
Great map, looks like a lot of work!
And thanks MistyBee, I'll be using your suggestions for my next map!
My business website: https://www.greatwhitenorthcartography.com/
My full cartographic portfolio: http://cargocollective.com/BodennerC...phic-Portfolio
My Patreon account: https://www.patreon.com/user?alert=2
Very nice, I love a detailed city map!
I'll make a couple of observations - the direction of shadows is a little inconsistent. The sun is seemingly in the northwest, but comparing the shadows of the hills to the east and south, and the line of city wall going around the top, that's not right. It's a nitpick I noticed because I'm pedantic
Secondly the green is a just a little too much for me but that's purely a matter of taste.
But overall very nice. What's the round O shaped building on Cobalt Boulevard? Looks important enough to have a label!
At first, I was a bit reserved about the vibrant green but your map packs some kick, that's for sure ! Great job Zach !
 Posting Permissions